SODAQ One, reading the battery voltage
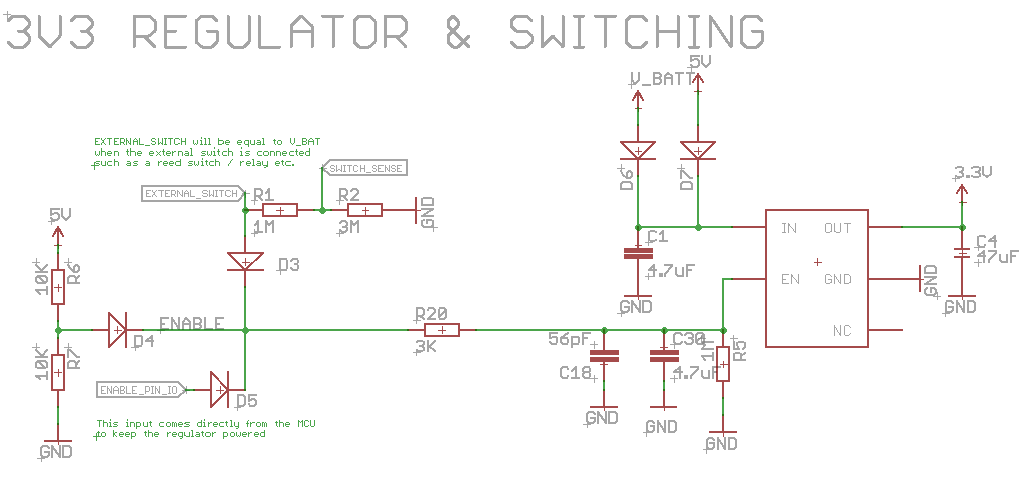
The board is powered on when the enable pin on the regulator is high. This happens under one of the 3 conditions:
- When the USB cable is plugged in, this makes the 5V line high, which in turn makes ENABLE high.
- When EXTERNAL_SWITCH is connected to V_BATT. This can be done by connecting pin 4 and 5 on the second header row together. Note: In V3 we placed a solderjumper, made by default.
- When the ENABLE_PIN_IO is set to high. If you however want to battery power it you want to be able to switch it on and off. This on/off switching can be done by wiring a switch between pin 4 and 5 (this is exactly what we do with our ONE base board).
Alternatively you could use a push button (momentary switch) to switch it on. This would however require that in software one of the first things you have to do is to set ENABLE_PIN_IO to high.
You can then write some code that allows you to switch it off again using the same push button. Alternatively you could use for instance a reed switch and a magnet to power it on and off.
From version 3 we placed a solderjumper to connect the EXTERNAL_SWITCH is connected to V_BATT. This zero Ohm resistor can be removed if you would like to use the on/off feature of the board.
Charging the battery
The battery can be charged by a connected USB cable and/or by the solar input.
It is possible to connect a USB charger and a solar panel.
The solar input is 5V. You can connect any other 5V device to charge the battery.
The change LED will lit when the battery is charged.
The LED will be off when the battery is full.
Example ENABLE_PIN_IO
void setup() {
  // put your setup code here, to run once:
  pinMode(ENABLE_PIN_IO, OUTPUT);
  digitalWrite(ENABLE_PIN_IO, HIGH);
}

void loop() {
  // put your main code here, to run repeatedly:

}
Note
When you use the ENABLE_PIN_IO together with the base, the off switch will not work.
To power down the One with the base.
Set the on/off switch to off and press the reset for 5 seconds.
Example to read the battery voltage
#define ADC_AREF 3.3f
// #define BATVOLT_R1 2.0f // One v1
// #define BATVOLT_R2 2.0f // One v1
#define BATVOLT_R1 4.7f // One v2 and v3
#define BATVOLT_R2 10.0f // One v2 and v3
#define BATVOLT_PIN BAT_VOLT

void setup() {
  // put your setup code here, to run once:
  SerialUSB.begin(57600);

  while(!SerialUSB){
    //wait for Serial Monitor to be opened
  }
}

void loop() {
  // put your main code here, to run repeatedly:
  SerialUSB.println(getBatteryVoltage());

  delay(1000);
}

uint16_t getBatteryVoltage()
{
    uint16_t voltage = (uint16_t)((ADC_AREF / 1.023) * (BATVOLT_R1 + BATVOLT_R2) / BATVOLT_R2 * (float)analogRead(BATVOLT_PIN));

    return voltage;
}
Questions
You can ask us anything on our Forum.